Building a One Page Site With Themify’s Ultra Theme
Foreward: Why Themify?
As a web developer dealing with the constant landscape changes on the internet, one can find it difficult to keep up. For years I’ve been checking into Web Designer Wall (webdesignerwall.com). The author, Nick La (@NickLa) does an amazing job at getting a jump on trends and adapting to them before they become commonplace. Web Designer Wall was the first place I learned how to make all the necessary changes for mobile optimization, which later became an essential SEO element. Being prepared for such changes gave me more sales than my competitors and highly increased my demand as a freelance developer. Anyway, this site teaches how to make a one page site with Themify.
Click here to view a one page site I made. Also, the video below is a companion to this tutorial.
TUTORIAL
What you need?
1. A WordPress.org Installation
2. A Themify theme or the Themify builder from Themify.me
Get the theme
This tutorial assumes you already have a wordpress.org installation and that you are somewhat familiar with WordPress. I recommend the Ultra Themify Theme. Follow the link in the last sentence and purchase the theme or click here to get one of Themify’s free themes. Install the theme.
Create the Page
So you are only going to make one page and link to the different sections of the site with anchor links (More on that later). Try to make your site have clear sections. For my example site I used the sections below. Each of the sections serves the role of a unique page.
Set Up the Anchor Links
Themify has a unusual way of setting this up in page anchors. If one was working outside of WordPress, they would use a javascript solution to create a ‘smooth-scroll’ or ‘soft-scroll’ effect. A smooth-scroll is less disorienting for the users, ensuring them that they are still on the same page and weren’t unknowing taken elsewhere.

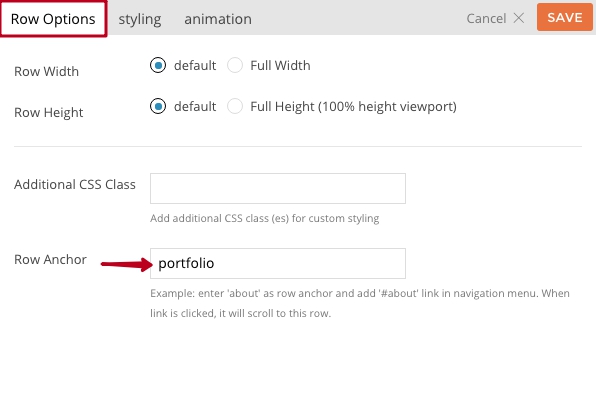
1. When in the page edit mode, go down to the Themify builder below the main input area.
2. Add anchor names to desired sections.
3. Make sure it works.
Add a Menu

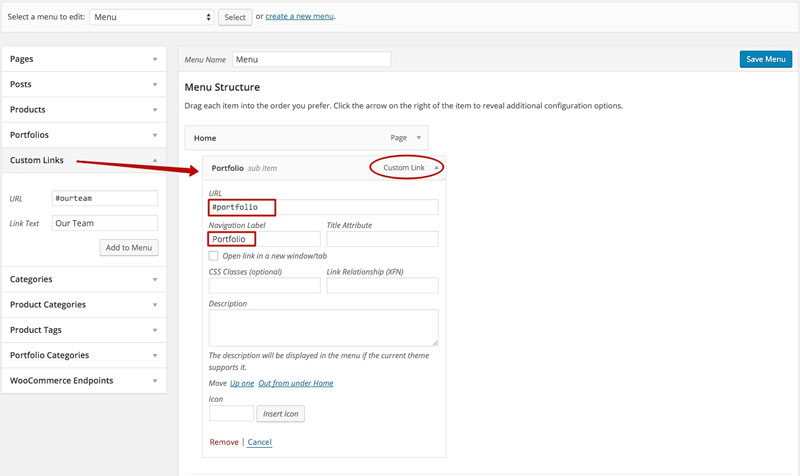
1. Go to menu in the ‘Appearance’ section of the WordPress dashboard.
2. Create a New Menu
3. Copy the URL’s from the specific sections of your page and use them as links in your new menu.
That’s just about it!
Please let us know if you made a page this way in the comments. As always, I welcome any comments or questions! Also, if you need more detailed instructions go here.


July 5, 2017 @ 6:23 am
I have a site with menu tabs: Home, About, Work, Contact. I’m using anchor tags for this one-page navigation.
But I don’t want my url to update to something like this – http://example.com/#about or ../#work ..
I just want simply the default url on the address bar (http://example.com/) whenever I click on the menu tabs and jump to different sections of that one page. I don’t want to update the address bar. How can I do that?
Please help me i am an intern and i have to complete my assignment anyhow. I am using themify-wordpress
July 7, 2017 @ 1:47 pm
This is not a function that comes with Themify out of the box. May I ask what the purpose of this functionality is? Also, Themify products come with great support. Your question is more in line with their services there.
https://themify.me/member/aff/go/josephabraham/?cr=aHR0cHM6Ly90aGVtaWZ5Lm1lL2ZvcnVt